MOBILE APP
The new HealthEquity mobile app provides easy, on-the-go access to all of your
health accounts. The free app provides comprehensive tools to help you manage
transactions and maximize your health savings.
Convenient, powerful tools:
On-the-go access
You can access all account types wherever you go
Photo documentation
Simply take a photo with your device to initiate claims and payments
Send payments & reimbursements
You can send payments to providers or reimburse yourself for out-of-pocket
expenses from your HSA
Manage debit card transactions
Link your debit card transactions to claims and documentation
View claims status
View the status of claims as well as link payments and documentation to claims
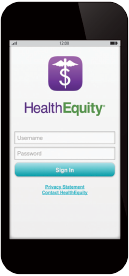
LOGGING IN
To log into the mobile app, you will use the same username and password created during your first-time log in to the member portal. If you have not logged in before, please do so online, preferably with a computer, prior to logging into the mobile app. If you are unsure of your login credentials, please contact member services for assistance at the phone number located on the back of your HealthEquity debit card.
If your password needs to be reset, you will need to create a new password on the member portal before it can be used to log into the mobile app.
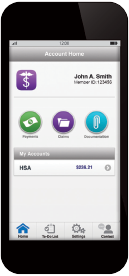
MOBILE APP HOME
On the home screen, you will see:
- Your name
- Member ID
- Buttons to access
- Payments
- Claims
- Documentation
- A list of your accounts and balances
- “Ever-present” navigation buttons:
- Home
- To-Do List
- Settings
- Contact
To view Account History, simply tap the gray arrow next to your account balance. Here you will see contributions, distributions, as well as any fees or interest.
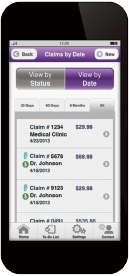
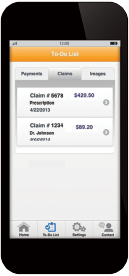
ADD A CLAIM
To add a new claim or view existing claims tap the Claims icon. On this screen you can see all of the integrated claims HealthEquity has received from your insurance company (if applicable), as well as claims you have entered manually.
To create a new claim, tap New in the top right corner and follow the prompts to enter the necessary information; tap Next. Review Claim Details and tap Finalize if accurate. You will have the option to add documentation to your claim by tapping Link Documentation and taking a picture of the receipt, EOB, or invoice, using your mobile device’s camera.
ADD AN EFT ACCOUNT
To add banking information for electronic fund transfers (EFT), tap Settings at the bottom of the screen, and then select Bank Accounts. To add an account, you will tap New in the top right corner. Enter the requested information, like routing and account number and click Next.
*The banking information added through the app can only be used for reimbursements. Contributions through the mobile app are not available at this time.
TO-DO LIST
To-Do items are those that have not yet been linked to a claim, payment or documentation. They are noted with an orange flag to set themselves apart from other items.
ADD AND LINK TO DOCUMENTATION
To upload a receipt, EOB or invoice to the mobile app, tap the Documentation icon. You will be able to select Camera, which
will allow you take a picture right on the spot, or Image Library to use a picture you have already taken. Once the image is selected, you can enter the date of the expense, type of documentation, and any applicable notes. Once saved, your image will be visible as an Unlinked document.
To link it to a particular claim or expense, select the picture and click Edit in the top right corner. Under Linked Payments, you can choose to link to a claim or payment. You can select whether you are linking to a new or existing claim/payment. If existing, you will select the correct claim/payment and tap Link. If adding new, you will be able to create a new entry using the steps listed in the Make a Payment section on page 33 and Add a Claim section on page 31.

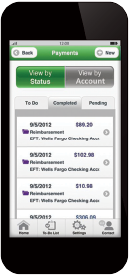
MAKE A PAYMENT
To make a payment or reimbursement, tap the Payments icon. You can view previous payments made by status or date, but to add a new payment tap New in the top right corner. You will select the account you would like the funds to come out of, and select either New or Existing type of expense. If HealthEquity receives integrated claims from your insurance company, you can send a payment using the existing information from the open claim on the following screen. If it is a new expense, you will be required to enter expense information, like provider, date of service, patient, etc., on the following screen. Next, indicate whether HealthEquity will be sending a payment to a provider or reimbursing you before continuing to the next screen. Enter in all requested information and tap Next. If everything is correct on the confirmation screen, tap Finalize to send the payment.